Tuesday, December 18, 2012

Merry Christmas

Pin It Now!

Monday, November 26, 2012

Modest Maven Holiday Coupon Code

Pin It Now!


Shop at Modest Maven and enter  HOLIDAY15  at checkout to receive 15% off your entire order! Includes sale items. Valid through December 7, 2012.


Fabric colors for custom clothing:

Tuesday, November 20, 2012

Tonight/Not Tonight Bridal Shower Pillow

Pin It Now!

Have you seen these pillows before? Best bridal shower gift ever! (Would also make a fabulous white elephant gift, yes?) I made this "Tonight/Not Tonight" pillow for my friend's shower last week. It received many hoots and hollers :) I also got to make her wedding dress and five bridesmaid dresses, but I'll save that for another post.


To class up her gift, I also included this "Keep" and "Toss" wedding garter set. You can find the tutorial on the left sidebar.


 Happy Thanksgiving!

Friday, November 16, 2012

MEGA happy holidays GIVEAWAY!

Pin It Now!
Head on over to the rikrak studio for your chance to win one of my custom Crisscross Women's Top, as well as many more fabulous prizes for the holidays! Best of luck!
the rikrak studio


Wednesday, October 3, 2012

Ruffle Bloomer Pants Pattern and Tutorial

Pin It Now!

Ya'll are in for a real treat... sure there are lots of online tutorials for kids pants, but here you can print a fabulously FREE pattern for sizes 2T-5T. This is such a versatile pattern. Add ruffles or don't. Crop the legs to capri length or leave them nice and long. Use fun prints, or make them solid. You can even keep it simple, and use it for boys pants!

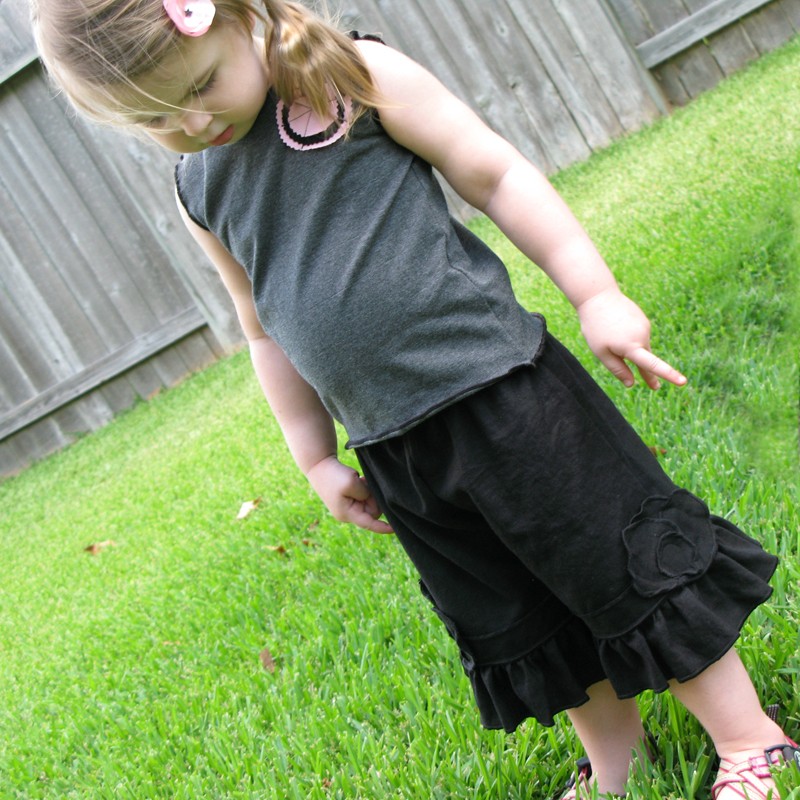
Here's a classy example of capri length, using black linen fabric and a little embellishing with the same linen:


For this tutorial, I decided to use some fun coordinating fabrics from the Wildwood Collection by Erin McMorris, which was graciously supplied by Imagine Fabrics.
 

Please note, I do not mind if you use this pattern for personal use, or even to sew and sell your own handmade toddler pants. However, please do not sell the actual pattern for profit... it is for everyone to enjoy free of charge.  

When printing the pdf pattern, make sure that the "page scaling" is set to "none". Measure the 1" scale box on your printout to ensure it measures exactly 1". Cut out and tape the three pattern pieces together per instruction.

Materials:
2/3 yard fabric for main pants
1/4 yard fabric for ruffles
1" non-roll elastic (measured and cut according to toddler's waist) (approximately 19" for 2T, 20" for 3T, 21" for 4T, 22" for 5T)

Step 1: Cut your pattern pieces. For the main piece, you will fold selvage ends together, then fold a second time. Line up your pattern on the double fold. The pattern does not include the ruffle piece. For the ruffles, cut two rectangles, measuring 4" x 42". Here are your pieces:

Step 2: Gather your ruffles by setting your sewing machine to a long baste stitch. Some sewing machines will gather well by increasing your upper tension to the highest setting. If not, then use a regular basting stitch and manually adjust your gathers by pulling on the thread ends and cinching along the length.


Tip: Press ruffles with a hot iron, so the gathers lay flat. This will help when piecing ruffles to the pant leg.
Step 3: Sew your ruffles to the hem of pants. Open the leg pieces and pin gathers right-side together with pant hems.  If your ruffle is longer than the hem, that's okay, just cut excess ruffle, so it is the same width of pant leg. If the ruffle is too short, adjust ruffle to length of pant leg. Sew using a 3/8" seam allowance.


Step 4: Press ruffle seam up and top stitch along top.


Step 5: Sew the pant crotch. Open both pieces and lay right-sides together. Sew down each crotch side. Unless you are using a serger, I recommend double stitching the crotch seams to reinforce. 


Step 6: Sew the pant legs. Lay the pants so the un-sewn edges of the legs are on the inseam. Pin, being sure to line up the ruffles, and stitch to make leg casings. 


Step 7: Sew the waistband. Fold and press the waistband 1/4" down all around. Then fold another 1 1/4" and press again. Since the front and back are the same, choose one of the crotch seams and sew waistband casing all around, leaving a 2" opening.


Step 8:  Insert the pre-measured elastic by using a safety pin. Be sure that the elastic does not twist. Overlap elastic ends 1 inch and sew a square to secure ends together. Slip a fabric tag in the opening, then finish stitching the waistband casing closed.


Step 9:  Hem the pant legs. Finish the pants by sewing a 1/4" hem on the ruffle hem.


 Happy sewing!

Friday, September 28, 2012

Pink and Blue Birthday Party

Pin It Now!
My second oldest turned 6 years old this month, and she begged and begged for a real birthday party (we usually just do family birthday parties). I'm impressed with parents who throw a full birthday party every year for their kids. My oldest got a "real" birthday party when he turned 4, and it seriously wore me out. I remember having only two real birthday parties when I was a kid, where I got to invite all my friends. I didn't turn out too damaged, so I'm carrying on that tradition for my kids.

 I made a white cake, with pink buttercream frosting, tiffany blue fondant, and pink gumpaste flowers. And you should have seen the ice cream... I made pink bubble gum and blue cotton candy sweet cream ice cream. They're still two of my favorite flavors... my sister-in-law teases me that I never out grew them :)

 For the party favors, each kid got to pick out a crayon wallet (tutorial here). I made 21 of those suckas. I'm kicking myself for not taking a picture of all of my hard work.

But at least we got a picture of the pinata! That was definitely a labor of love project. There's a week's worth of paper mache and tissue flowers getting smashed in 10 minutes. So much fun though :)

Winner of the Crayon Wallet Giveaway!

Pin It Now!
And the winner of the fabulous Crayon Wallet Giveaway is....


Number 15, Lynn who said, "I pinned this wonderful, awesome, spectacular project! Thanks for the chance to win".


Congratulations! Please email me with your shipping address :)


Thanks so much to everyone for participating! I have another sewing tutorial in the works, so stay tuned!

Friday, September 21, 2012

♥ Crayon Wallet Giveaway ♥

Pin It Now!
 ♥ Giveaway ended. Congratulations to Lynn! 

Is their anything better than waking up Friday morning to a fabulous giveaway? Why yes, yes there is... how about TWO giveaways!?! Up for grabs is this totally rad crayon wallet made by yours truly, with fabric provided by Imagine Fabrics

How to Enter: 

All you need to do to enter is "pin" my awesome crayon wallet tutorial (click here) to Pinterest, then head back to this blog post and tell me that my tutorial rocks your world, and that you obeyed my command. After you're done stroking my ego, head on over to Imagine Fabrics to double your chances of winning a SECOND crayon wallet. Yep, I made two.

click on the logo to be directed to the second giveaway

Terms of the Giveaway:

  The giveaway ends on Friday, September 28th at 12pm central time. The winner will be randomly selected and results posted the same day. 
  No purchase is necessary.
  Odds of winning are based on number of entries.
  One entry allowed per person. Participant must first "pin" crayon wallet tutorial, then comment on this post.
  Prize value is $10, and includes first class shipping within the US.
  US residents, 18 and older are eligible to enter.


  Good Luck!

Thursday, September 20, 2012

Easy on the Pocket Crayon Wallet Tutorial

Pin It Now!


Hello fellow crafters! I've teamed up with Imagine Fabrics to bring you a most fabulous tutorial with some even more fabulous fabric. A special thanks to Imagine Fabrics for supplying me with this adorable fabric from the Kumari Garden Fabric Collection by Dena Fishbein. The owner of Imagine Fabrics has been lovely to work with, so please mosey on over to her shop and check out all the beautiful designer quilting cottons she has in stock. We will each be doing a crayon wallet giveaway tomorrow... that's TWO separate giveaways, which means double your chances of winning a crayon wallet of your own!


When I was pricing these to make as party favors for my daughter's birthday party, $1.50 per notepad added up really fast, so instead I pulled out my paper cutter and quartered 10 sheets of copy paper to give me a nice little stack for each crayon wallet. And that is why I call this the Easy on the Pocket Crayon Wallet! This wallet is sized just right for us economical moms on the go. Run out of paper? Don't have time to run to the store to buy another note pad? No problem! All you have to do is yank some paper from your printer and cut more :)  Forward march to the tutorial...

Materials:

Outer Shell: cut 1, 7" x 10 1/2" rectangle of quilting cotton, *stabilized with fusible interfacing
Inner Lining: cut 1, 7" x 10 1/2" rectangle of quilting cotton
Inside Pockets: cut 2, 7" x 7" squares of quilting cotton
Tab Closure: cut 1, 3" x 3" square, *stabilized with fusible interfacing
Snap or Velcro closure

*Note: you only need to use interfacing for quilting weight cottons. If you decide to use canvas or heavy weight fabric, you may omit using fusible interfacing.


Step 1: Cut your pieces. Use a rotary cutter and cutting mat if you have them to ensure nice, straight edges. Otherwise, measure carefully and cut your pieces with scissors. Here are all the pieces:


Step 2:  Stabilize the back of your Outer Shell piece with fusible interfacing. Set aside.


Step 3: Make the tab. Stabilize the back of your 3" x 3" square piece with fusible interfacing. Fold in half and sew the top and side using a 1/4" seam allowance, leaving bottom open. Clip corners, turn right-side out, press and top stitch. Set aside.


Step 4: Make the pockets. Fold the 7"x 7" square in half and press with hot iron. Repeat for other pocket piece. On only one of the pocket pieces you will use the iron to make creases to indicate stitch lines for your crayon dividers. So on one pocket, fold in half again and press. Now measure 1 1/2" from your center line and make another crease to the left of the center crease. Repeat for third crease on right of the center crease. You should have three crease lines on one of your pockets.


Step 5: Attach the pockets. Lay each pocket on the right-side of short ends of the Lining piece. Make sure the pressed folded sides face each other, and the unfinished edges are flush with the Lining edge. Pin in place and stay-stitch along the sides of the pocket using a 1/8" seam allowance. Now use your crease lines as guides to stitch the crayon dividers.


Step 6: Attach tab. Center the tab on the center crease line of the crayon pocket. Stay-stitch in place using an 1/8" seam allowance along the edge.


Step 7: Attach your fastener. Whether you are using a snap or Velcro, it is easiest to attach before sewing the outer shell and lining pieces together. On one short end of the Outer Shell piece, position your snap or Velcro piece centered and measure 1 1/2" in from the edge. Attach or sew in place (on the right-side of Outer Shell fabric).


Step 8: Lay the Outer Shell piece and Lining/Pocket pieces right-side together (Snap/Velcro of Outer Shell should be on the opposite end of the tab). Using a 1/4" seam allowance, sew around entire rectangle, leaving a 2 1/2" opening for turning at the bottom of a long side. Clip corners and turn wallet right-side out. Press well with hot iron, folding in the opening and pressing flush with the wallet edge. 


*Note: Take care not to iron over snap or Velcro.


Step 9: Finish the wallet by topstitching around the entire wallet using a 1/8" seam allowance, closing the 2 1/2" opening. Attach the opposing snap or Velcro piece on the tab.


Step 10: Cut the paper, add some crayons and you're good to go!


♥  Fantastic Job!


Video Tutorial compiled by Imagine Fabrics